The art of posing · Free course pilot

Learn to see the pose.
Then make it your own.

An audio-led introduction to posing. Begin with intention, make space for confidence, and learn why an image works. Listen to each complete lesson or read along below; narrated audio and visual companions accompany each chapter.

3 complete sample lessonsFull transcriptsAudio narration & visuals included
Editorial portrait illustrating the art of posing course
Your learning path

Three ideas that change how you pose

Each section has a complete lesson, narrated audio guide, visual companion, and a practical exercise.

Section 01 · Understanding posingAbout 2 minutes

A pose is a choice, not a shape

Learn the three decisions behind a useful pose: intention, action and camera view.
Listen to the lessonRendered narration · full transcript below
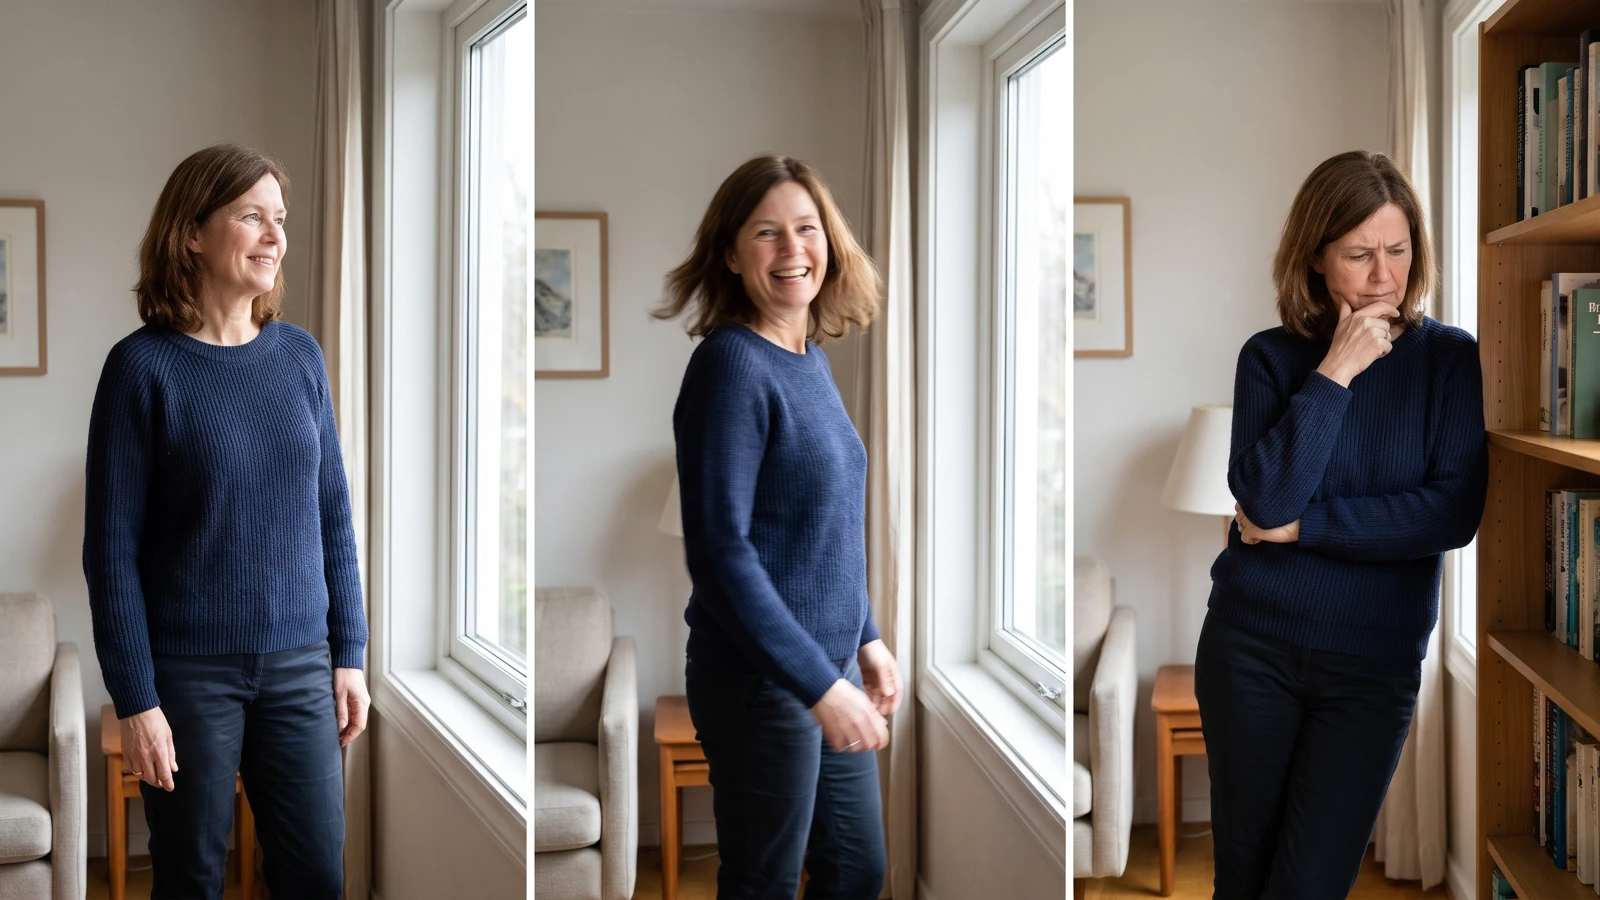
Three portraits in the same place showing calm, playful and thoughtful intentions
Visual companion for this lesson
Read the full transcript

Welcome to the Miles Flow posing course. Before we talk about feet, hands or angles, start with a simpler question: what do you want this photograph to feel like? Calm, energetic, intimate and assured are different intentions. They lead to different choices, even when the same person stands in the same place.

A pose is the arrangement of a person for an image. It includes where the body is, where attention goes, what the person is doing, and how the camera sees that moment. It can be deliberate or it can happen during an action. Natural does not have to mean accidental. A person leaning on a doorway while listening to someone can look natural because the action gives the body a reason to be there.

Here is a useful three-part method. First, choose an intention. Say: I want this portrait to feel relaxed. Second, choose an action that fits. Perhaps the person rests a hand on a chair, looks towards a window and lets their weight settle into one leg. Third, choose the camera view. A wider frame can show the chair and the setting; a tighter frame can make the expression the centre of the story.

Now change only the intention. If the image should feel energetic, the person might turn towards the camera or take a step. The subject has not changed. The pose has changed because the message changed. This is more useful than memorising a list of shapes without knowing why to use them.

When you study a pose reference, ask four questions. What is the person doing? Where is their weight? What direction are the face and eyes taking? What part of the image does the camera emphasise? You can borrow the underlying idea while changing the exact position to suit the person, their comfort and the place.

Try it now. Choose one word for a photograph you would like to make. Stand or sit comfortably. Give yourself one small action that supports that word. Turn your gaze once, then change the camera framing or imagine how it would look closer. Notice which choice changes the feeling most. The goal is not a perfect pose. The goal is to make one intentional choice and see its effect.

See the idea in pictures

Visual studies

Compare one change at a time as you read or listen.
Try it

Take three photographs in the same place. Keep the camera fixed. Aim for calm, playful and thoughtful by changing only your action and gaze. Write down which change communicated each intention.

Remember: Start with intention, give the body an action, then choose the camera view.
Section 02 · The psychology of being photographedAbout 2 minutes

Why the camera can make us freeze

Use attention, choice and a small action to make a photo session easier.

Listen to the lessonRendered narration · full transcript below
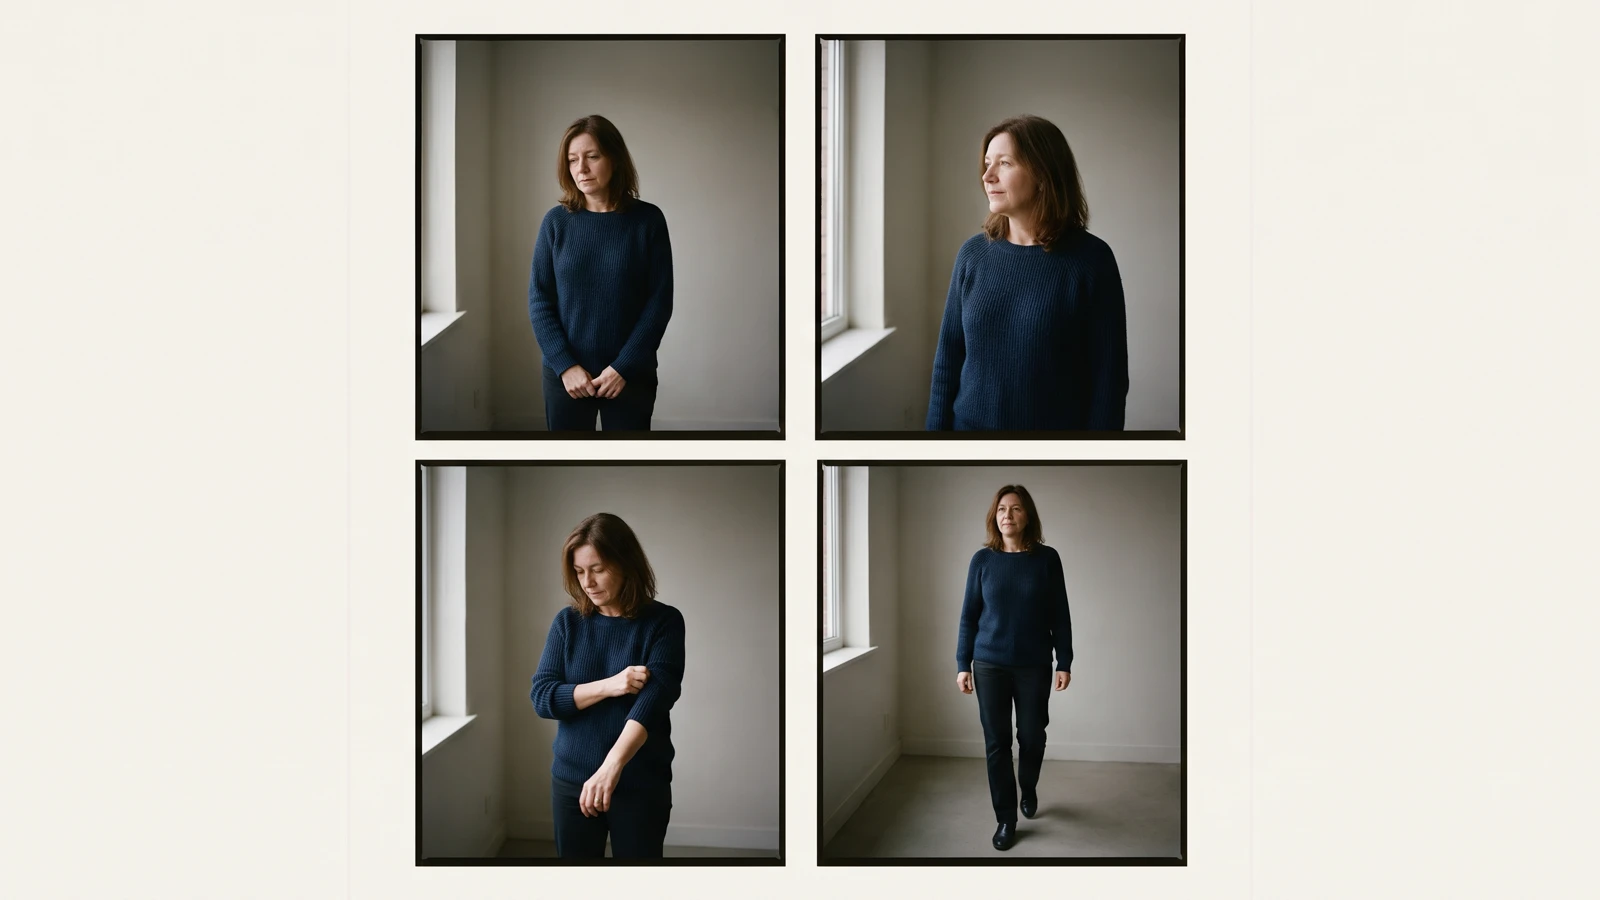
Four frame portrait sequence moving from a still pose to simple natural actions
Visual companion for this lesson
Read the full transcript

If you tense up when a camera points towards you, you are in familiar company. A photograph asks you to notice yourself while imagining how other people might see you. Some people then try to control their hands, face, posture and expression all at once. That is a lot of decisions for a single moment.

The first step is to remove some decisions. Choose one simple task instead of trying to look natural. Hold a cup, adjust a sleeve, look at a point just past the camera, or walk slowly to a mark. An action gives your attention a place to go. It also gives the photographer a moment to watch rather than demanding an instant expression on command.

Choice matters. Before a photograph, decide what you are comfortable showing and what kind of image you want. You can ask to see a test frame. You can change a pose that feels awkward. If you are directing someone else, ask what they want from the image and whether a suggested action feels comfortable. Give one cue at a time and allow room for a different answer.

Try using a short reset. Plant your feet or settle into the chair. Let the shoulders move once rather than forcing them down. Breathe normally. Look away from the camera, then return your attention when you are ready. This is a practical pause, not a promise that a posture will change your mood or biology.

Seeing a photograph of yourself can also feel strange because a still frame removes movement and catches one fraction of an expression. One frame is evidence of one instant. Review a small series and ask what changed in camera distance, light, timing and expression before treating the picture as a verdict about yourself.

Here is the practice. Set a timer for a short series. For the first frame, simply stand still. For the next three, give yourself one task: turn towards a window, touch a sleeve, then take a step. Choose the photograph that best expresses your intended mood, not the one that passes an imaginary test of how you should look. Confidence grows when you can make choices, observe results and adjust.

See the idea in pictures

Visual studies

Compare one change at a time as you read or listen.
Try it

Make a four-frame sequence: one still frame and three frames with a small task. Note which task felt easiest and which frame best expressed your intention. Repeat with a seated option if preferred.

Remember: Reduce decisions, give attention a task, and keep the subject in control of the image.
Section 03 · Why poses work visuallyAbout 2 minutes

Shape, space and the viewer's eye

See how lines, separation and balance make a pose readable in a photograph.

Listen to the lessonRendered narration · full transcript below
Same subject and camera view comparing a closed silhouette with a clear arm and torso separation
Visual companion for this lesson
Read the full transcript

A photograph turns a three-dimensional person into a flat frame. The viewer reads shapes, edges, gaps, contrast and relationships within that frame. That is why a position that feels subtle in person may look very different in a photograph. The useful question is not whether a pose is universally good. It is whether the picture communicates what you intended.

Start with the outline. Imagine the subject as a silhouette. Can you tell where an arm sits against the torso? Can you see the direction of the shoulders? If every edge overlaps, a small movement can help: move the elbow away from the body, turn the torso slightly, or let the hand rest on a visible surface. The aim is clarity, not a required body shape.

Next, look at lines. A straight, centred stance can feel steady and formal. A diagonal made by a shifted hip or bent arm can bring movement. A curved line can feel softer. These are visual possibilities, not rules about personality. The background changes them too. A strong vertical doorway behind a subject can reinforce stillness; a path leading into the distance can pull the eye through the image.

Space matters as much as the body. The gap between an arm and the waist, the distance between two people, and the space above a head all affect what is easy to see. A hand placed over a busy pattern may disappear. The same hand against a plain wall becomes a clear gesture. Before adding a more complicated pose, check whether the frame needs simpler separation.

Balance is another choice. Symmetry can make an image calm or ceremonial. Asymmetry can give it direction. Neither is automatically better. A centred headshot may benefit from balance; a walking portrait may benefit from uneven angles that show motion.

Try a controlled comparison. Keep the camera and light still. Make one frame facing forward with arms close to your body. In the next, turn a little and move one elbow so its outline is visible. In the third, keep that body position but change where you look. Compare the silhouette, the lines and the feeling. Naming the change teaches more than simply choosing a favourite frame.

See the idea in pictures

Visual studies

Compare one change at a time as you read or listen.

Try it

Photograph three variations from one camera position. Change only silhouette, then gaze. Describe where your eye goes first in each frame and what creates that path.

Remember: Read the outline, lines and spaces in the finished frame; change one detail to test its effect.
Keep practising

Bring these ideas into your next photograph.

Choose an intention. Give yourself or your subject a simple action. Then look at the shape, space and feeling in the finished frame.

Explore pose references →